
목차

이전글
[Spring Security] OAuth 네이버 로그인하기
목차 이전글 https://lotuus.tistory.com/79 [Spring Security] OAuth 구글 로그인하기 목차 [이전 게시글] 꼭! 봐주세여 [Spring Security] 동작방법 및 Form, OAuth 로그인하기 (Feat.Thymeleaf 타임리프) 목차..
lotuus.tistory.com
네이버와 동일하게 카카오는 CommonOAuth2Provider에 등록되어있지 않다.
Spring Security - OAuth2 카카오 로그인하기
카카오 설정
사진 중간중간 파란 글씨로 작성한 내용은 application.properties에 작성될 내용이다!!
1. 카카오 개발자 센터 접속
Kakao Developers
카카오 API를 활용하여 다양한 어플리케이션을 개발해보세요. 카카오 로그인, 메시지 보내기, 친구 API, 인공지능 API 등을 제공합니다.
developers.kakao.com
2. 내 애플리케이션 > 애플리케이션 추가하기

3. 애플리케이션 정보 입력 후 저장

4. REST API가 client-id이다. 확인하고 플랫폼 설정하기 클릭
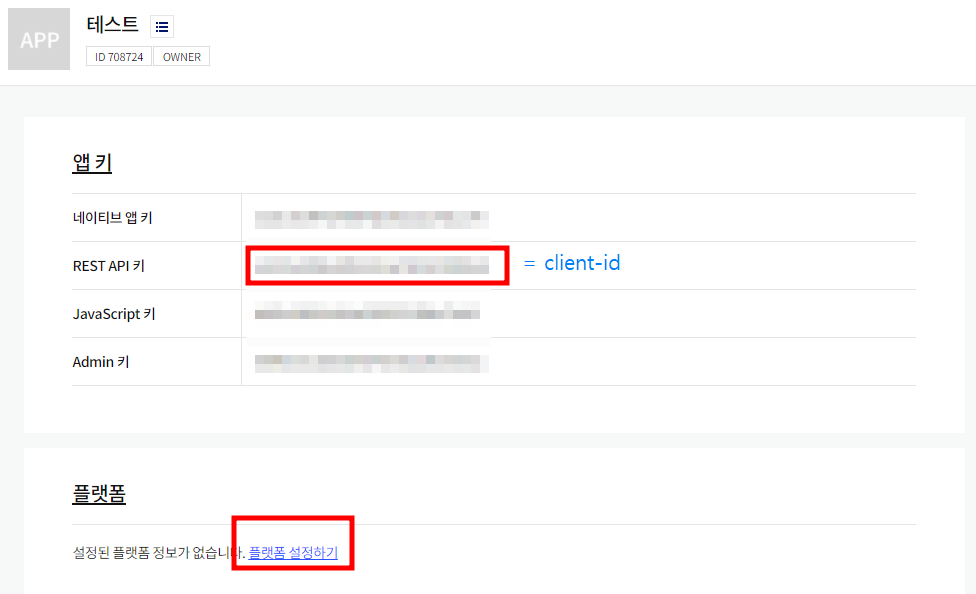
5. Web 플랫폼 등록 클릭

6. 사이트 도메인에 localhost:8080입력

7. Redirect URI 등록하러 가기 클릭

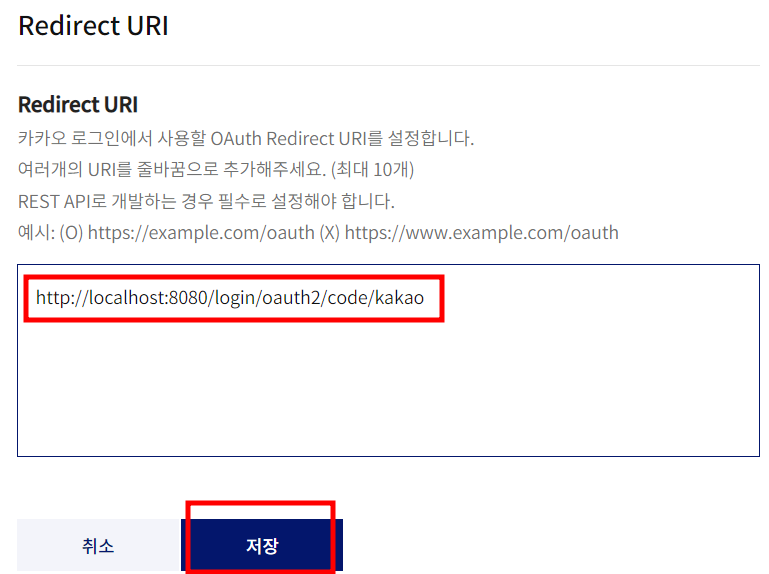
8. 카카오 로그인 활성화 "ON"으로 변경, Redirect URI 등록 클릭

9. http://localhost:8080/login/oauth2/code/kakao 입력
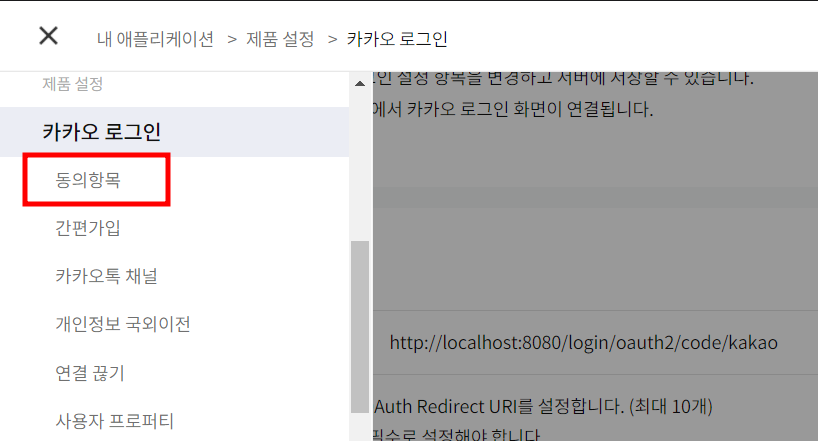
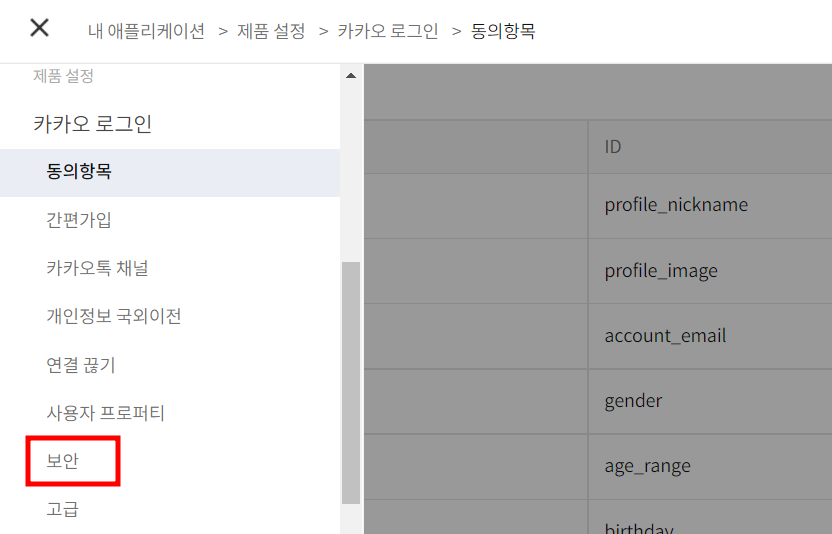
10. 왼쪽 메뉴바를 눌러서 동의항목 클릭
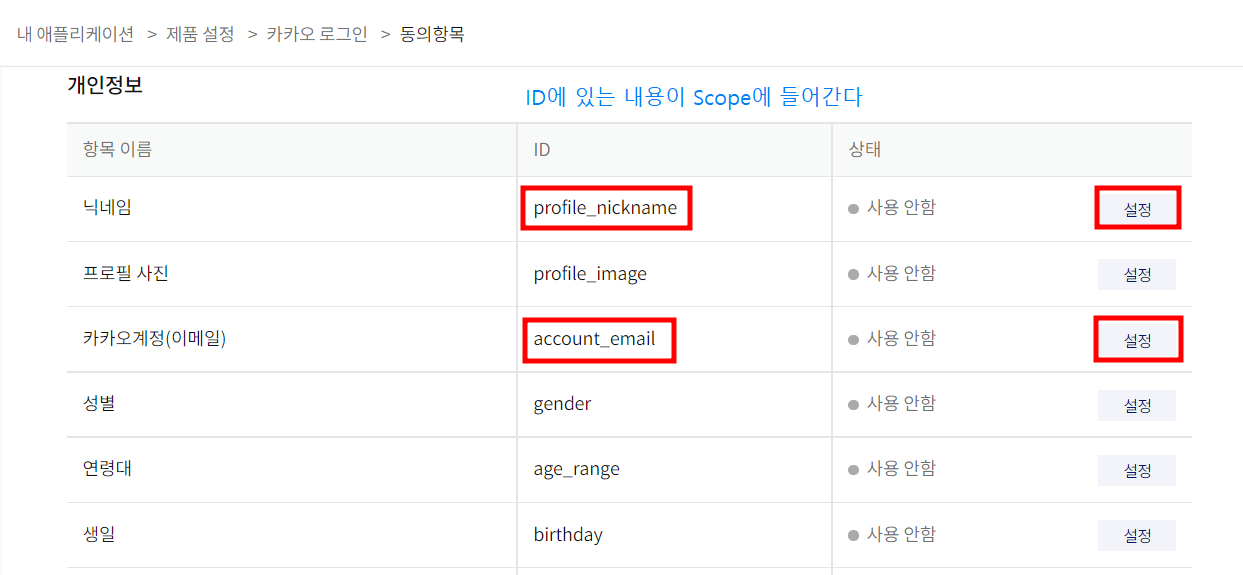
11. 가져오려는 정보 설정하여 사용으로 변경
12. 왼쪽 메뉴 눌러서 보안 클릭
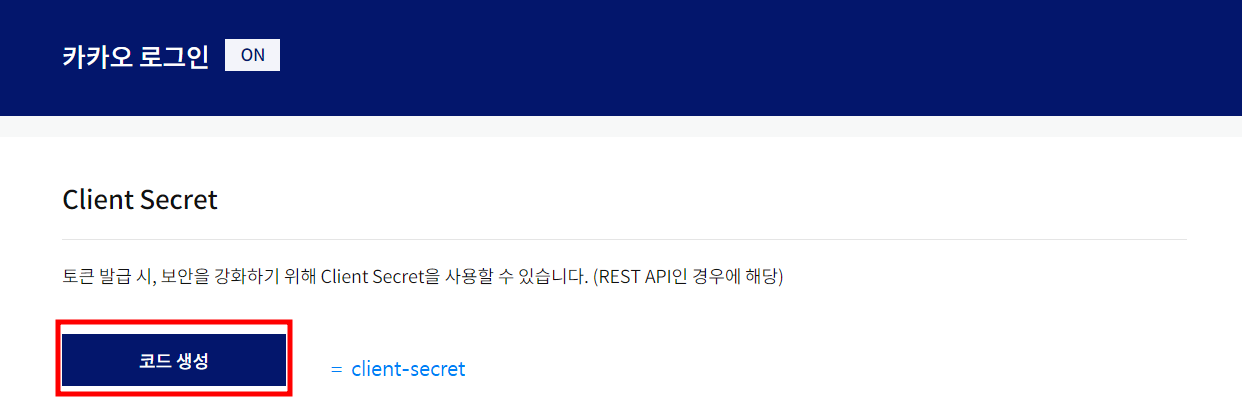
13. Client Secret 코드 생성 클릭하여 확인.
OAuth2 설정
build.gradle : 이전과 동일함
application.properties
#Kakao
spring.security.oauth2.client.registration.kakao.client-id =
spring.security.oauth2.client.registration.kakao.client-secret =
spring.security.oauth2.client.registration.kakao.scope = profile_nickname, account_email
spring.security.oauth2.client.registration.kakao.client-name = Kakao
spring.security.oauth2.client.registration.kakao.authorization-grant-type = authorization_code
spring.security.oauth2.client.registration.kakao.redirect-uri = http://localhost:8080/login/oauth2/code/kakao
spring.security.oauth2.client.registration.kakao.client-authentication-method = POST
spring.security.oauth2.client.provider.kakao.authorization-uri = https://kauth.kakao.com/oauth/authorize
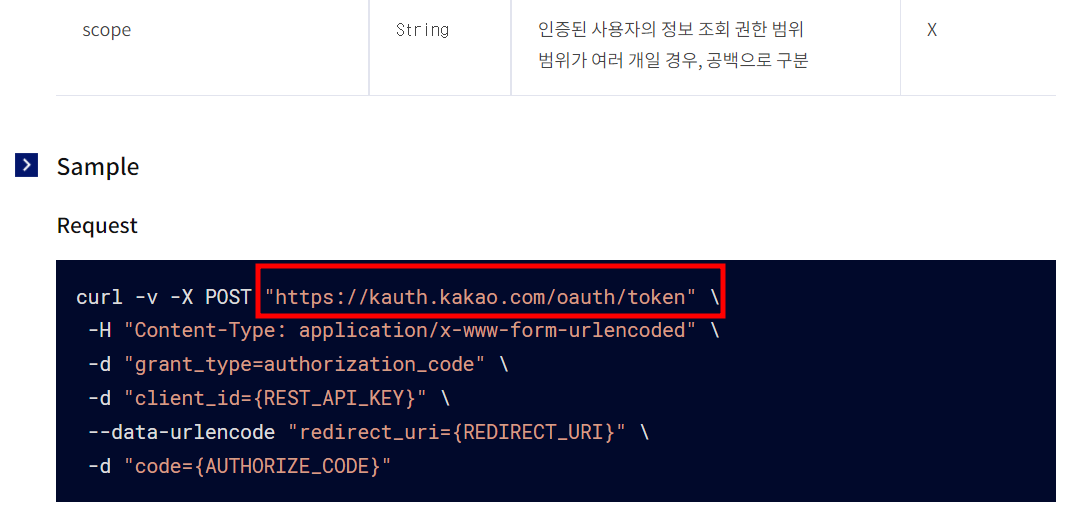
spring.security.oauth2.client.provider.kakao.token-uri = https://kauth.kakao.com/oauth/token
spring.security.oauth2.client.provider.kakao.user-info-uri = https://kapi.kakao.com/v2/user/me
spring.security.oauth2.client.provider.kakao.user-name-attribute = id| registration.kakao.client-name | 자동 생성되는 로그인 페이지에서 노출하는 등에 사용한다(꼭 있어야하는지는 모르겠다..) |
| registration.kakao.authorization-grant-type | OAuth2는 4가지 Authorization Grant유형이 있다 네이버는 가장 많이 사용되는 authorization_code 방식을 이용한다 (참고) |
| registration.kakao.redirect-uri | 카카오가 사용자 확인 후 정보를 내 프로젝트로 보내주는 주소 구글처럼 패턴을 가지고 있다. "{baseUrl}/login/oauth2/code/{registrationId}" |
| registration.kakao.client-authentication-method | 카카오는 필수 파라미터를 POST로 요청한다고 나와있다.(참고) |
| provider.kakao.authorization-uri | 인증을 요청하는 url을 작성한다 (참고) |
| provider.kakao.token-uri | 토큰을 요청하는 url을 작성한다 (참고 > Sample > Request 링크) |
| provider.kakao.user-info-uri | 회원 정보를 가져오는 url을 작성한다 (참고) |
| provider.kakao.user-name-attribute | { "id":~, "kakao_account":{~}, "properties":{~} } 카카오는 위와같이 결과를 반환해준다. id로 지정한다 (네이버는 하위필드가 존재하는 response로 잡았었는데.. 카카오는 상위필드로 잡아줘도 문제없는 것 같다..) |
OAuth2UserInfo 인터페이스와 KakaoUserInfo 클래스
카카오의 경우는 providerId값을 "id"로 가져오면된다.
패키지 > auth 폴더 > userinfo 폴더 > OAuth2UserInfo.java : 이전과 동일
패키지 > auth 폴더 > userinfo 폴더 > KakaoUserInfo.java
public class KakaoUserInfo implements Oauth2UserInfo{
    private Map<String, Object> attributes;
    private Map<String, Object> attributesAccount;
    private Map<String, Object> attributesProfile;

    public KakaoUserInfo(Map<String, Object> attributes) {
        /*
        System.out.println(attributes);
            {id=아이디값,
            connected_at=2022-02-22T15:50:21Z,
            properties={nickname=이름},
            kakao_account={
                profile_nickname_needs_agreement=false,
                profile={nickname=이름},
                has_email=true,
                email_needs_agreement=false,
                is_email_valid=true,
                is_email_verified=true,
                email=이메일}
            }
        */
        this.attributes = attributes;
        this.attributesAccount = (Map<String, Object>) attributes.get("kakao_account");
        this.attributesProfile = (Map<String, Object>) attributesAccount.get("profile");
    }

    @Override
    public Map<String, Object> getAttributes() {
        return attributes;
    }

    @Override
    public String getProviderId() {
        return attributes.get("id").toString();
    }

    @Override
    public String getProvider() {
        return "Kakao";
    }

    @Override
    public String getEmail() {
        return attributesAccount.get("email").toString();
    }

    @Override
    public String getName() {
        return attributesProfile.get("nickname").toString();
    }
}
OAuth2Login loadUserByUsername
패키지 > auth 폴더 > PrincipalOauth2UserService.java
@Service
public class PrincipalOauth2UserService extends DefaultOAuth2UserService {

    @Autowired private UserRepository userRepository;
    @Autowired private BCryptPasswordEncoder bCryptPasswordEncoder;

    @Override
    public OAuth2User loadUser(OAuth2UserRequest userRequest) throws OAuth2AuthenticationException {

        OAuth2User oAuth2User = super.loadUser(userRequest);

        OAuth2UserInfo oAuth2UserInfo = null;
        String provider = userRequest.getClientRegistration().getRegistrationId();

        if(provider.equals("google")){
            oAuth2UserInfo = new GoogleUserInfo(oAuth2User.getAttributes());
        }
        else if(provider.equals("naver")){
            oAuth2UserInfo = new NaverUserInfo(oAuth2User.getAttributes());
        }
        else if(provider.equals("kakao")){	//추가
            oAuth2UserInfo = new KakaoUserInfo(oAuth2User.getAttributes());
        }

        String providerId = oAuth2UserInfo.getProviderId();
        String username = provider+"_"+providerId;

        String uuid = UUID.randomUUID().toString().substring(0, 6);
        String password = bCryptPasswordEncoder.encode("패스워드"+uuid);

        String email = oAuth2UserInfo.getEmail();
        Role role = Role.ROLE_USER;

        User byUsername = userRepository.findByUsername(username);

        //DB에 없는 사용자라면 회원가입처리
        if(byUsername == null){
            byUsername = User.oauth2Register()
                    .username(username).password(password).email(email).role(role)
                    .provider(provider).providerId(providerId)
                    .build();
            userRepository.save(byUsername);
        }

        return new PrincipalDetails(byUsername, oAuth2UserInfo);
    }
}
OAuth2Login Authentication OAuth2User
패키지 > auth 폴더 > PrincipalDetails.java : 이전과 동일
OAuth2Login Domain구현
패키지 > domain 폴더 > Role.java : 이전과 같음
패키지 > domain 폴더 > User.java : 이전과 같음
OAuth2Login Controller 구현
패키지 > controller 폴더 > UserController.java : 이전과 같음
OAuth2Login View구현
resources > templates > join.html : 이전과 같음
resources > templates > login.html
<!DOCTYPE html>
<html xmlns:th="http://www.thymeleaf.org" xmlns:sec="http://www.thymeleaf.org/extras/spring-security">
<head>
    <meta charset="UTF-8">
    <title>로그인 페이지</title>
</head>
<body>
<h1>로그인 페이지</h1>
<hr/>

<h2>로그인 유저 : </h2>
<p sec:authentication="principal"></p>

<div sec:authorize="isAnonymous()" style="background-color:pink; padding:1em;">
    <form action="/login" method="post" >
        <input type="text" name="username" />
        <input type="password" name="password" />
        <button>로그인</button>
    </form>

    <a href="/oauth2/authorization/google">구글 로그인</a>
    <a href="/oauth2/authorization/naver">네이버 로그인</a>
    <a href="/oauth2/authorization/kakao">카카오 로그인</a>
    <!-- /oauth2/authorization/{registrationId}에 요청이 들어오면,
    스프링 시큐리티가 provider의 authorization-uri로 요청을 전달한다-->
    <br><br>

    <a href="/joinForm">회원가입하기</a><br>
</div>

<div sec:authorize="isAuthenticated()" style="background-color:pink; padding:1em;">
    <a href="/logout">로그아웃</a>
</div>

<br><br>
<a href="/user">유저</a><br>
<a href="/manager" sec:authorize="hasRole('ROLE_MANAGER') or hasRole('ROLE_ADMIN')">매니저</a><br>
<a href="/admin" sec:authorize="hasRole('ROLE_ADMIN')">어드민</a><br>

<br><br>
<a href="/form/loginInfo">Form 로그인 정보</a>
<a href="/oauth/loginInfo">OAuth2 로그인 정보</a>
<a href="/loginInfo">로그인 정보</a>

</body>
</html>
'Backend' 카테고리의 다른 글
| 자바, Spring Boot로 크롤링하기 - Selenium 이용 (동적페이지), 속도 개선 방법 (0) | 2022.03.08 |
|---|---|
| 자바, Spring Boot로 크롤링하기 - Jsoup 이용 (정적페이지) (0) | 2022.03.07 |
| [JPA] 값 타입(기본값, @Embedded, 값타입 컬렉션) (0) | 2022.02.22 |
| [JPA] 프록시와 즉시로딩, 지연로딩 / 영속성 전이와 고아객체 (0) | 2022.02.21 |
| [JPA] 상속관계 매핑, 공통 속성 매핑 (0) | 2022.02.21 |