
목차
Welcome페이지
/resources/static 에 index.html을 생성하면 스프링부트가 welcome페이지로 처리해준다.
Logging 로깅
스프링부트는 자동으로 spring-boot-starter-logging 라이브러리를 사용하고,
spring-boot-starter-logging라이브러리는 SLF4J, Logback 라이브러리를 사용한다.
SLF4J는 수많은 로그 라이브러리를 인터페이스로 제공하고
Logback은 로그 라이브러리를 구현하는 구현체이다.
System.out.println은 콘솔에만 출력되지만
로그는 콘솔뿐만 아니라 파일, 네트워크 등의 별도의 위치에 남길 수 있다.
양이 많아지면 특정기준에 따라 로그를 분할할 수 있고, 성능도 System.out 보다 좋다.
import org.slf4j.Logger;
import org.slf4j.LoggerFactory;
import org.springframework.web.bind.annotation.RequestMapping;
import org.springframework.web.bind.annotation.RestController;

@RestController
//@Slf4j
public class LogTestController {
    private final Logger log = LoggerFactory.getLogger(getClass()); // = @Slf4j 와 같다

    @RequestMapping("/log-test")
    public String logTest(){
        String name = "Spring";
        //System.out.println("name = " + name);

        log.trace("trace log={}", name);
        log.debug("debug log={}", name);
        log.info("info log={}", name);
        log.warn("warn log={}", name);
        log.error("error log={}", name);
        //{}에 name이 치환된다.

        //아무 설정없이 실행하면 info, warn, error만 출력된다
        //2021-12-01 22:09:02.429  INFO 13728 --- [nio-8080-exec-1] hello.springmvc.basic.LogTestController  : info log=Spring
        //2021-12-01 22:09:02.433  WARN 13728 --- [nio-8080-exec-1] hello.springmvc.basic.LogTestController  : warn log=Spring
        //2021-12-01 22:09:02.433 ERROR 13728 --- [nio-8080-exec-1] hello.springmvc.basic.LogTestController  : error log=Spring
        //시간, 로그레벨, 프로세스ID, 쓰레드명, 클래스명, 로그메시지 순으로 출력된다.

        //resources/application.properties파일에 logging.level.hello.springmvc=trace 설정하면 trace, debug, info, warn, error 출력되고
        //resources/application.properties파일에 logging.level.hello.springmvc=debug 설정하면        debug, info, warn, error 출력된다.
        //개발서버는 debug, 로컬피시는 trace, 운영서버는 info로 설정한다.

        return "ok";
    }
}
("log="+name)이 아닌 ("log={}", name)으로 사용하는 이유?
("log="+name)은 name값을 가져와서 + 연산하는 과정에서 리소스가 많이 사용되고
연산이 모두 완료된 다음 로그 출력 레벨(trace인지 info인지...)을 확인하기때문에 헛수고 하는 일이 생길 수 있다.
반면에 ("log={}", name)은 로그 출력 레벨을 먼저 확인하기때문에 헛수고를 방지할 수 있다.
@RestController와 @Controller의 차이
@Controller를 사용하면 @RequestMapping메서드의 반환값 문자열을 ViewName으로 판단해서 뷰를 찾고, 뷰가 렌더링된다.
반면에 @RestController는 @RequestMapping메서드의 반환값 문자열을 HTML메시지 바디에 바로 입력한다.
다양한 요청맵핑 @RequestMapping
| @GetMapping("/url") | = @RequestMapping(value = "/url", method = RequestMethod.GET) |
| @PostMapping("/url") | = @RequestMapping(value = "/url", method = RequestMethod.POST) |
| @PatchMapping("/url") | = @RequestMapping(value = "/url", method = RequestMethod.PATCH) |
| @DeleteMapping("/url") | = @RequestMapping(value = "/url", method = RequestMethod.DELETE) |

Request의 Header내용 출력하기
@Slf4j
@RestController
public class RequestHeaderController {

    @RequestMapping("/headers")
    public String headers(HttpServletRequest request,
                          HttpServletResponse response,
                          HttpMethod httpMethod,
                          Locale locale,
                          @RequestHeader MultiValueMap<String, String> headerMap,
                          @RequestHeader("host") String host,
                          @CookieValue(value = "myCookie", required = false) String cookie
                          ){

        /*
        * HttpMethod : Http메서드를 조회한다
        * httpMethod=GET
        *
        * Locale : Locale정보(언어)를 조회한다
        * locale=ko_KR
        *
        * @RequestHeader MultiValueMap<String, String> headerMap : 모든 HTTP헤더를 MultiValueMap형식으로 조회한다
        *     MultiValueMap : 하나의 키에 여러 값을 받을 수 있다.
        * headerMap={content-type=[application/json], accept=[* / *], connection=[keep-alive], content-length=[32]} ...등등
        *
        * @RequestHeader("host") String host : 특정 HTTP헤더를 조회한다
        * header host=localhost:8080
        *
        * @CookieValue(value = "myCookie", required = false) String cookie : 특정 쿠기를 조회한다
        * myCookie=null
        * */

        log.info("request={}", request);
        log.info("response={}", response);
        log.info("httpMethod={}", httpMethod);
        log.info("locale={}", locale);
        log.info("headerMap={}", headerMap);
        log.info("header host={}", host);
        log.info("myCookie={}", cookie);

        return "ok";
    }
}
GET, POST의 Query Parameter 내용 가져오기 : @RequestParam
GET : /url?username=hello&age=20
POST : Http Message Body에 username=hello&age=20
결국 GET이나 POST나 쿼리파라미터 형식으로 전달한다.

@RequestParam의 required, defaultValue 속성
@RequestParam으로 가져온 매개변수에 required 속성으로 필수여부를 지정할 수 있다. (true가 기본값이다)
@RequestParam으로 가져온 매개변수에 defaultValue 속성으로 기본값을 지정할 수 있다.
defaultValue는 "" 빈문자가 들어와도 적용된다.
@RequestParam(required=true) String username
/* username에 값이 필수로 들어와야 한다
 * /url (X)
 * /url?username (OK) : username에 ""입력됨
*/

@RequestParam(required=false) int age
/* age에 값이 선택적으로 들어올 수 있다
 * /url (X)
 * 주의!! Integer는 객체라서 null이 들어올 수 있지만 int는 null이 들어올 수 없다
*/

@RequestParam(required=false) Integer age
/* age에 값이 선택적으로 들어올 수 있다
 * /url (O) : age에 null입력됨
*/

@RequestParam(required=false, defaultValue=0) int age
/* age에 값이 선택적으로 들어올 수 있고, 값이 없으면 기본으로 0을 넣는다.
 * /url (OK) : age에 0입력됨
*/

@RequestParam(required=true, defaultValue=guest) String username
/* username에 값이 필수로 들어와야 하고, 값이 없거나 "" 빈문자면 guest를 넣는다
 * /url (X)
 * /url?username (OK) : username에 guest입력됨
*/
@RequestParam의 모든 값 Map으로 가져오기
    @ResponseBody
    @RequestMapping("/request-param-map")
    public String requestParamMap(@RequestParam Map<String, Object> paramMap) {
        log.info("username={}, age={}", paramMap.get("username"),paramMap.get("age"));
        return "ok";
    }
    // /request-param-map?username=aa&age=10
    // username=[aa], age=[10]

    @ResponseBody
    @RequestMapping("/request-param-map")
    public String requestParamMap(@RequestParam MultiValueMap<String, Object> paramMap) {
        log.info("username={}, age={}", paramMap.get("username"),paramMap.get("age"));
        return "ok";
    }
    // /request-param-map?username=aa&age=10&username=aa&age=20
    // username=[aa, aa], age=[10, 20]
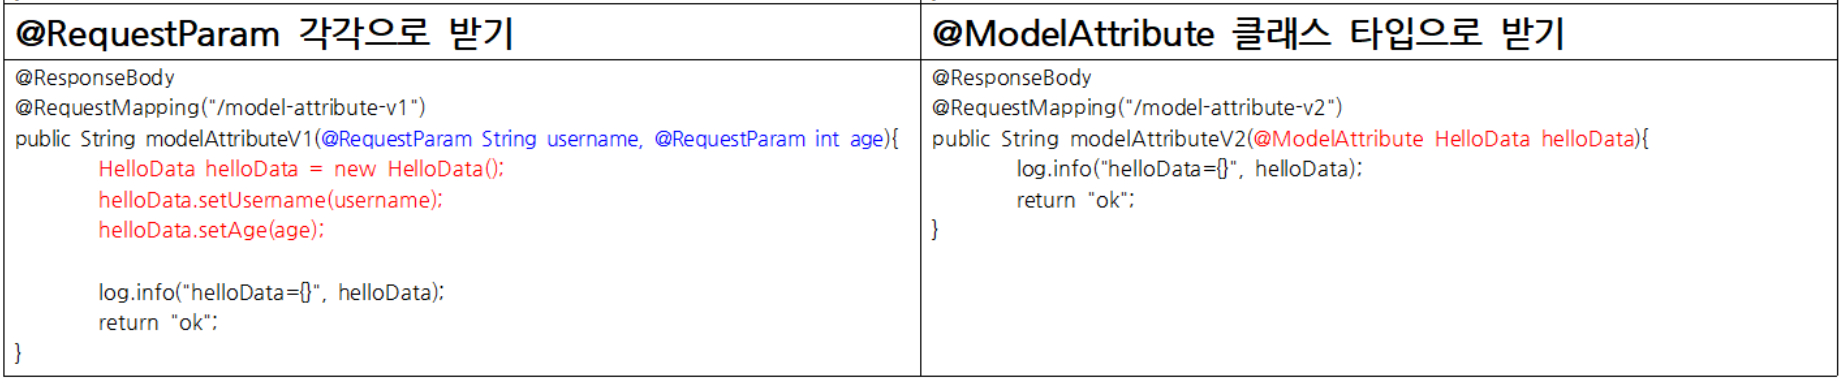
GET, POST의 Query Parameter를 클래스로 받기 : @ModelAttribute
매번 request에서 parameter를 각각 받으면 클래스를 생성하고 set하는 과정이 발생한다.
@ModelAttribute는 이 과정을 자동으로 처리해준다.
@ModelAttribute는 HelloData 클래스를 확인한 후 모든 setter들을 가져와서 파라미터의 값을 바인딩한다.
(@ModelAttribute HelloData helloData)를 (HelloData helloData)처럼 작성할 수 있다
@Data
public class HelloData {
    private String username;
    private int age;
}
HTTP API의 HTTP Message Body의 데이터 가져오기
HTTP API에서 주로 사용하는 방식으로,
HTTP Message Body에 데이터를 직접 담아서 전달한다.
단순 텍스트 조회
Get, Post방식과는 다르기때문에 @RequestParam, @ModelAttribute를 사용할 수 없다!!
헤더정보가 필요하면 HttpEntity
메시지바디정보가 필요하면 @RequestBody, @ResponseBody를 사용하자.
메시지 바디 조회(@RequestBody)와 요청 파라미터 조회(@RequestParam , @ModelAttribute)는 전혀 관계가 없다.

JSON 조회
HttpEntity, @RequestBody를 사용하면 HTTP Message Converter가 BODY의 내용을 문자나 객체, JSON으로 자동변환해 준다.
(그래서 "@RequestBody 객체타입"을 사용할 수 있고, 메서드 반환타입을 String이 아닌 HelloData로 사용할 수도 있다.)
🔥🔥 스프링은
String, int, Integer과 같은 단순타입은 @RequestParam으로 처리
나머지(객체.. 등)는 @ModelAttribute로 처리하기때문에
여기서 @RequestBody를 생략하면 @ModelAttribute로 처리된다.

@RequestBody : JSON 요청 → HTTP 메시지 컨버터 → 객체
@ResponseBody : 객체 → HTTP 메시지 컨버터 → JSON 응답
HTTP응답하기 : 정적리소스, 뷰 템플릿
| 정적리소스 | /resources/static /resources/public |
정적인 HTML, CSS, JS를 제공할 때 사용 왼쪽 디렉토리명에 파일을 넣어두면 스프링 부트가 정적리소스로 서비스를 제공한다. |
| 뷰 템플릿 | /resources/templates | 동적인 HTML을 제공할 때 사용 |
| HTTP 메시지 | HTTP API를 제공할 때 사용 (위에서 요청과 함께 살펴보았다) |
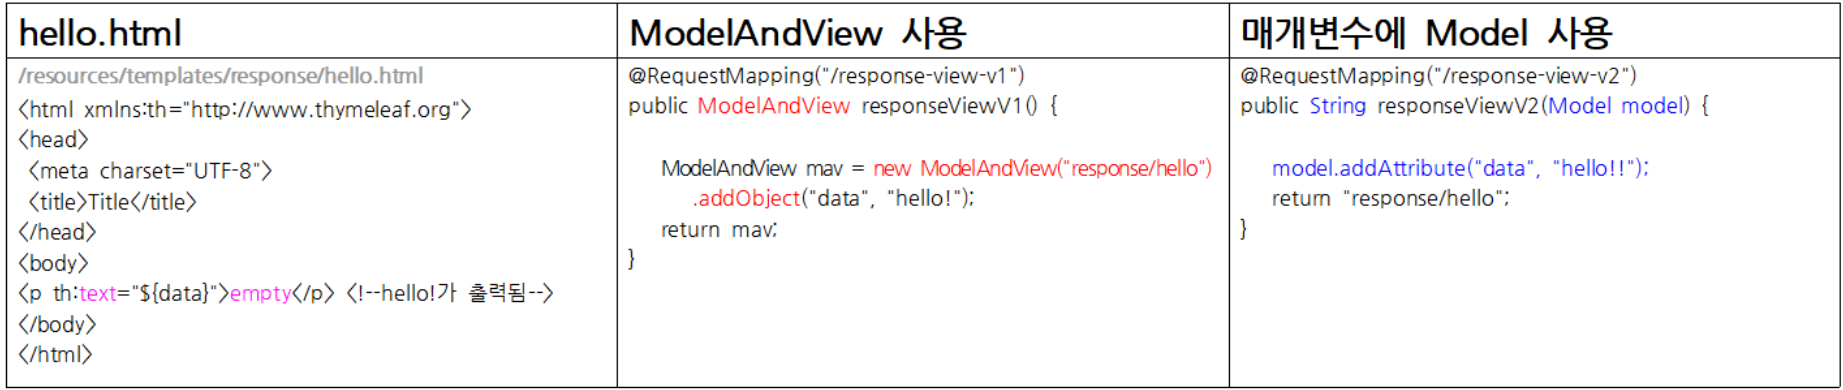
뷰 템플릿 응답하기
@ResponseBody가 없기때문에 "response/hello"로 뷰 리졸버가 실행되어 뷰를 찾고 렌더링한다
@ResponseBody가 있으면 HTTP 메시지 바디에 response/hello가 입력된다.
HTTP API 응답하기
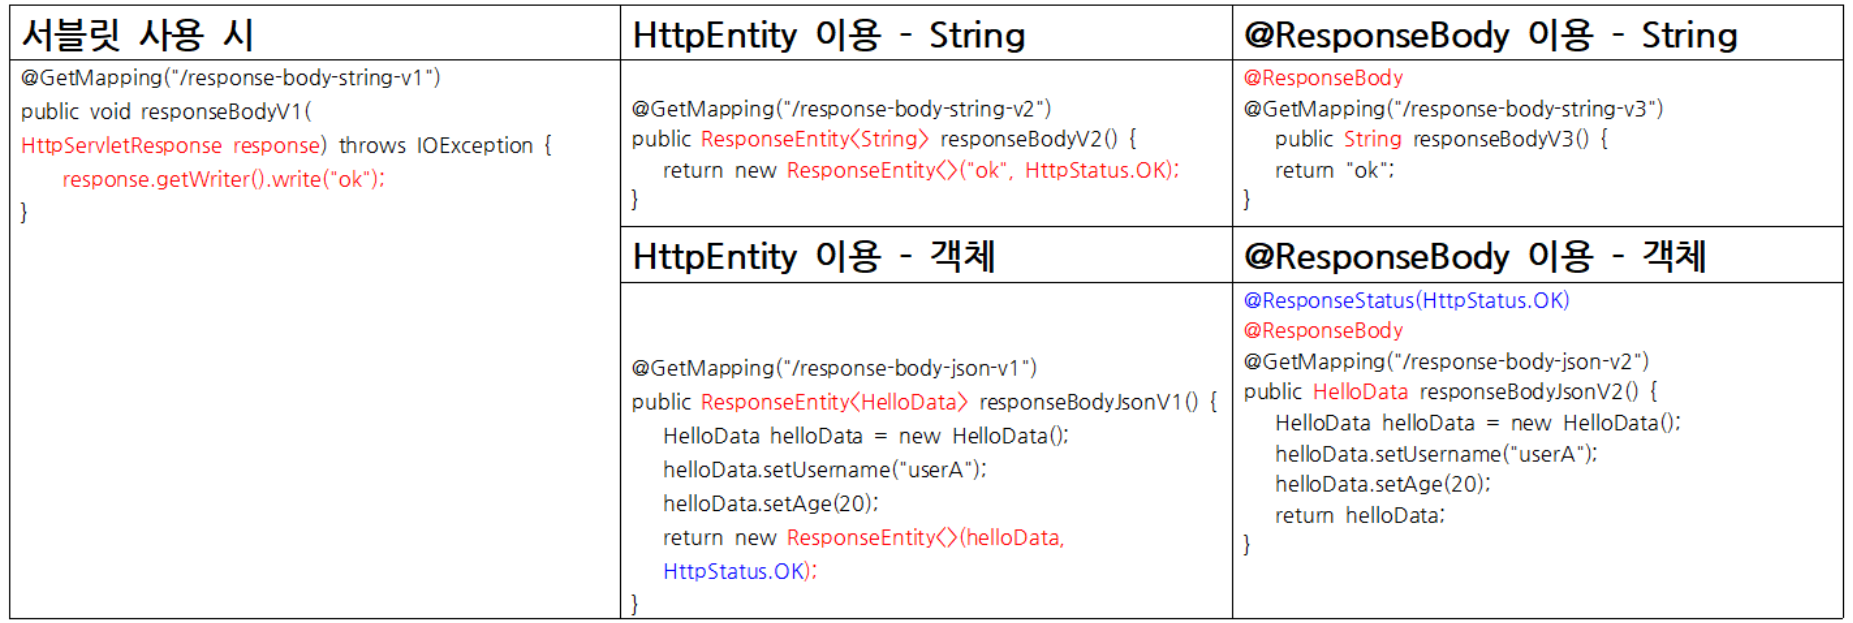
HTTP 메시지 컨버터
스프링은 @RequestBody, @ResponseBody, HttpEntity를 사용할 때 메시지 컨버터를 사용한다.
package org.springframework.http.converter;
public interface HttpMessageConverter<T> {
  boolean canRead(Class<?> clazz, @Nullable MediaType mediaType);
  boolean canWrite(Class<?> clazz, @Nullable MediaType mediaType);
  // canRead, canWrite : 메시지컨버터가 해당 클래스, 미디어타입을 지원하는지 체크

  List<MediaType> getSupportedMediaTypes();

  T read(Class<? extends T> clazz, HttpInputMessage inputMessage)
  throws IOException, HttpMessageNotReadableException;
  // 메시지컨버터를 통해서 메시지를 읽는다

  void write(T t, @Nullable MediaType contentType, HttpOutputMessage
  outputMessage)
  throws IOException, HttpMessageNotWritableException;
  // 메시지컨버터를 통해서 메시지를 작성한다
}
| 0순위 : ByteArrayHttpMessageConverter | byte타입 데이터를 처리한다. @RequestBody byte[] data @ResponseBody return byte[] 미디어타입 : application/octet-stream |
| 1순위 : StringHttpMessageConverter | String타입 데이터를 처리한다. @RequestBody String data @ResponseBody return "ok" 미디어타입 : text/plain |
| 2순위 : MappingJackson2HttpMessageConverter | 객체, HashMap, Json 등..의 데이터를 처리한다. @RequestBody HelloData data @ResponseBody return helloData 미디어타입 : application/json |
RequestMappingHandlerAdapter 요청 맵핑 핸들러 어댑터 동작방식
애노테이션 기반의 컨트롤러는 다양한 파라미터(HttpServletRequest, Model, @RequestParam....)들을 사용할 수 있었다.
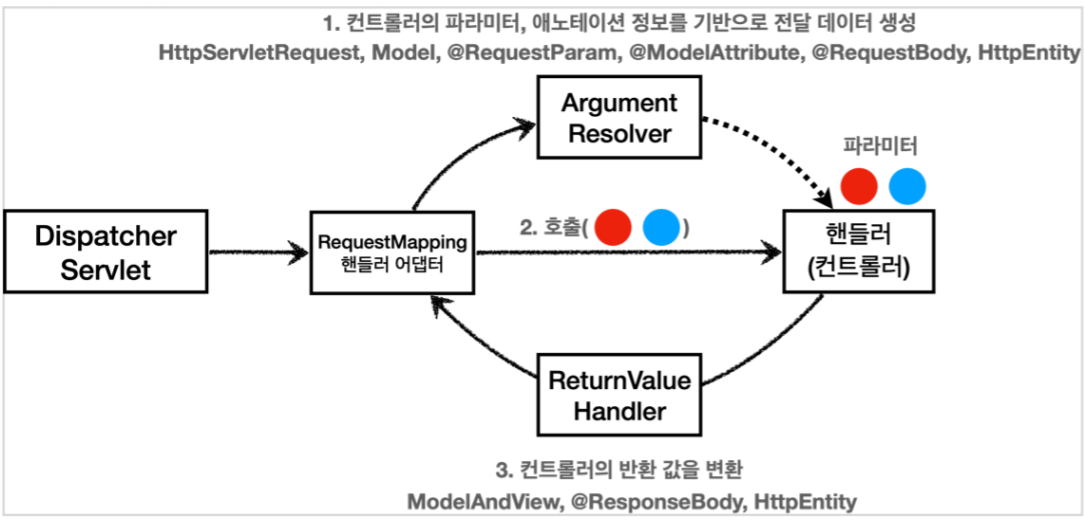
1. RequestMappingHandlerAdapter는 HandlerMethodArgumentResolver(ArgumentResolver)를 호출하여 핸들러(각 컨트롤러)가 필요로하는 파라미터 객체를 생성한다.
2. HandlerMethodArgumentResolver(ArgumentResolver)는 파라미터의 값이 모두 준비되면 핸들러(각 컨트롤러)에게 값을 넘겨준다.
3. 핸들러(각 컨트롤러)는 로직을 수행하고 값을 반환하면서 HandlerMethodReturnValueHandler(ReturnValueHandle)을 호출한다.
4. HandlerMethodReturnValueHandler(ReturnValueHandle)는 리턴값을 처리한 후 RequestMappingHandlerAdapter에게 값을 반환한다.
HandlerMethodArgumentResolver(ArgumentResolver) 덕분에 HttpServletRequest 대신 @RequestParam으로 쉽게 값을 꺼낼 수 있고
HandlerMethodReturnValueHandler(ReturnValueHandle) 덕분에 각 컨트롤러에서 String으로 viewName을 반환해도 동작할 수 있다.
여기서 Http Message Converter는 ArgumentResolver, ReturnValueHandle에서 호출하게된다.
인프런 - 스프링MVC 백엔드 웹개발 핵심기술
'Backend' 카테고리의 다른 글
| Cookie와 Session, 그리고 Token (0) | 2021.12.09 |
|---|---|
| Spring Validation 정리 (0) | 2021.12.08 |
| 스프링 MVC 구조, DispatcherServlet, @RequestMapping.. (0) | 2021.12.01 |
| FrontController, View, Model, Adapter, Handler (0) | 2021.12.01 |
| 서블릿, JSP, MVC패턴 (0) | 2021.11.25 |